
Today I decided to experiment with Rainbow Henna “Persian Blonde” Hair Color and Conditioner. For those of you who do don’t know about henna, I will give a quick lesson quoting directly from the Rainbow henna packaging!
“Henna is an alternative to chemical hair colorings that are controversial to health considerations. Henna comes from small shrubs, called Lawsonia, that are native to the Middle East, West Asia, and North Africa. The leaves are dried and then pulverized to a fine powder.”
-Rainbow Henna
Henna is 100% organic and a lot of naturals I have followed throughout the years do not necessarily use it for its coloring effects, but for the deep conditioning treatment it provides. Henna works great as a conditioner because it smoothes the hair’s cuticle and gives the hair a shiny and polished look. Henna also helps with the thickening of the hair and helps limit hair breakage and splitting.
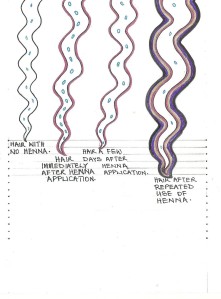
Below is a picture I found on the CurlytoKinky website to describe the long term effects of using Henna:
http://curly2kinky.com/hair-care/henna/
In the diagram above;
‘Hair with No Henna’ – represents curl pattern and length of hair pre henna application, the blue dots represent the moisture level of the hair.
‘Hair Immediately After Henna Application’ – represents the curl pattern, length and thickness of hair immediately after the henna application. Notice the blue dots are more, due to the initial entrapment of water in the hair follicle by the henna. All this adds to the weight of the hair, giving the initial feeling of heaviness, and length to the hair.
‘Hair a Few Days After Henna Application’ – represents the hair a few days after the henna has been applied, hair has shrunk in length and curl pattern, but not quite to it’s old structure. Notice also the reduction of blue dots back to the moisture level pre-henna.
‘Hair After Repeated Use of Henna’ – Here not only is the hair thicker, due to numerous coatings of henna, but much heavier therefore the curl pattern is opened even further – for those with very tight curls more defined and there will be more noticeable length in the hair. But notice the reduction in blue water dots, this is because the henna coating also stops penetration of water into the structure of the hair. Hence why some people find this practice later leads to dry hair.
Now let’s get down to the nitty gritty! I went ahead and got all of my supplies to get started!
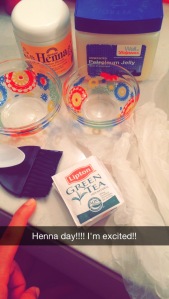
I boiled one cup of water and steeped 3 green tea bags in the hot water. (I used green tea because it stimulates hair growth and softens the hair. Green tea also contains Vitamins E and C which promotes glossy, radiant hair.) While the tea was getting ready, I poured 1 cup of my Henna mixture into a glass bowl. I slowly began to pour my green tea into the henna, and stirred with a spoon. I continued to pour and stir until all of my water was poured into the bowl. The henna mixture was very thick, and I stirred until all clumps were gone, and the mixture had a cake batter consistency.
I then added 1 cup of cheapo conditioner to my mixture. I used “Herbal Essence- Hello Hydration Moisturizing Conditioner.” I then stirred this all together and let it set, while I washed my hair.
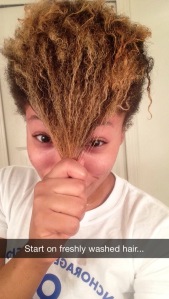
I washed my hair with “As I Am- Coconut CoWash Cleansing Conditioner” and de-tangled with the product in my hair before rinsing. After, I dried my hair with a t-shirt and squeezed as much water out as I could before prepping for my henna.
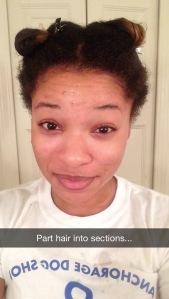
I then parted my hair into 3 sections. For those of you that don’t know, I am still growing my hair out from a tapered cut, so the back and sides are still substantially shorter than the rest of my hair. This is why I part my hair into 3 sections instead of the traditional 4 sections.
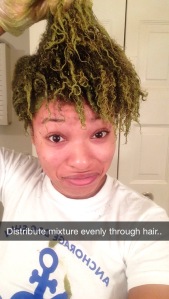
After my hair was separated into sections, I went through each section and parted my hair, and distributed the henna mixture evenly from root to tip. Once my whole head was covered and all of my strands were covered, I took whatever remaining mix there was, and massaged it into my hair and used my fingers to rake the product through all of my strands.
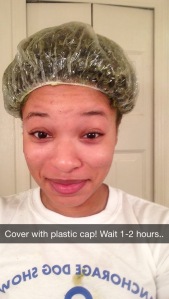
Lastly, I covered my hair with a plastic cap and did some cleaning around the house for a couple of hours, while the henna did its thing! You can use a hair dryer with henna, but I chose to use a plastic cap and leave it on longer so I could get some things done on my day off! 🙂
When it was time to rinse the henna, I removed my cap and put my hair under warm flowing water. The henna felt very gritty and thick. My hair was very heavy. It took a lot longer to rinse the henna than I anticipated, and it almost felt like someone had dumped a bucket of sand on my head! I tried my best to not put my hands in my hair, to limit manipulation and tangles. After several minutes under the running water, all of the henna was rinsed from my hair. I then applied my regular conditioner, and let that set for a couple of minutes before rinsing.
Results:
I noticed my hair felt thicker and heavier compared to how it felt when I originally washed it before applying the mixture. My curls were not noticeably loosened due to the henna treatment, but most sources state that it takes multiple applications before that begins to happen. Over the next few days, I noticed a lot less shedding when I would de-tangle my hair. My curls have also looked more hydrated and defined.
All in all, I feel that henna is a great conditioning treatment. I will definitely try a few more applications to get a full understanding of the long term benefits henna has to offer! I will definitely keep you guys in the loop with pics and posts!
As always natural sisters….stay bold, stay classy, stay patient, and most important, stay NATURAL!
Much Love,
T. Rowe ❤


